How to Install Windows 8 Complete with Images
How to Install Windows 8 Complete with Images - The new operating system that Microsoft launched 6 years ago on October 26, 2012 which can be used for its own computer and On June 26, 2013, Microsoft released a trial version of Windows 8.1 (formerly known as Windows Blue)
Before starting the installation phase you have to know the specifications that are needed so that Windows 8 can operate properly on our computer, here are the specifications. instalikes
- Processor Speed: 1 GHz
- (RAM) Memory: 1 GB for 32 bits and 2 GB for 64 bit versions
- DirectX 9 graphics processor and WDDM model 1.0 driver
- HDD (empty space): 16 GB for 32 bits and 20 GB for 64 bit versions
The following is how to install Windows 8 / 8.1 complete with images:
1. First enter the DVD into the CD-ROM> turn on the computer and enter the bios menu.
To enter the bios menu, please use the F2, F10 or DELET keys on the keyboard most likely each PC / laptop is different.
Select in the Boot section set on 1 Boot Device with [CDROM]
To save press the F10 key > Ok
2. Boot from the Windows 8 installation media.
Press any key on the computer keyboard to boot from the DVD Windows 8 or flash drive with the Windows 8 installation file.
3. Wait until Windows 8 Installation files have finished loading.
During the file loading process, just don't press any button because it will automatically enter the first install menu.
4. Set the language, time and other preferences.
Select the Language to be installed, the Time and currency format, and the Keyboard or input method that you prefer to use in Windows 8.
After selecting " Click Next "
5. Click install now.
Click install now in the middle of the screen, just below the Windows 8 logo. This will start the process of installing Windows 8.
6. Wait for Windows 8 to setup is starting.
The setup process of Windows 8 setup process is the beginning now.
You might see this screen for a few seconds, but not too long, don't do anything, the tap will automatically start itself.
7. Enter product yy Windows 8.
This is where you enter Product Key , the 25-digit code that you received when you bought Windows 8.
or you can search for a Product Key that has been widely spread on the internet.
After entering the Product Key, click Next.
8. Accept the Windows 8 software license agreement.
Check the section i aceept the license terms > Click Next.
9. Select the Windows installation method.
At this stage select , Custom: Install Windows only (advanced) . because we did a reinstall clend install.
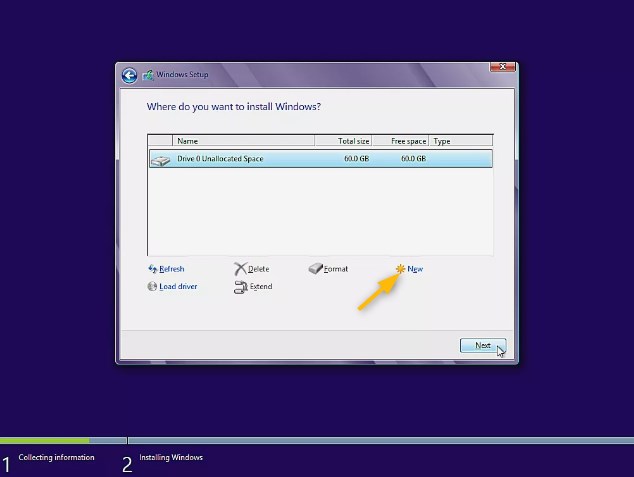
10. Display the Windows 8 advanced drive option .
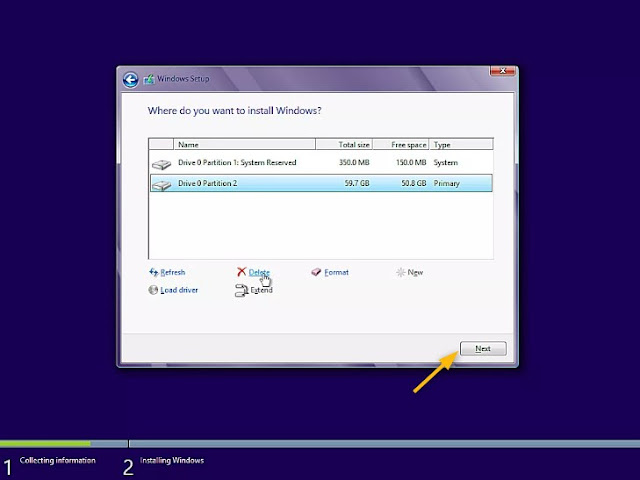
Where do you want to install Windows? Your screen will see a list of all partitions that Windows 8 sees on the computer. And deleting the old partitions in partition 2.
11. Make a new partition for the installation.
Click the New command to create a new installation partition.
12. Determine the partition size for the installation.
After determining the size of the hard drive partition press Apply then there will be a partition creation command click> OK.
13. Select the location to install Windows 8.
Select the unallocated space that is suitable for installing Windows 8 but on Drive partition 2 > Next Click Next.
14. Wait while Windows 8 is installed. Copy all the files needed and install the operating system.
Windows 8 Setup will now start installing Windows 8 to the partition it created from the empty space you selected in the last step. All you have to do here is wait.
15. Restart your computer.
If the Windows 8 installation process ends, your computer will reboot automatically you can press restart now to speed up.
16. Wait for Windows 8 to install hardware (Hardwer).
You will see the Ready indicator for the device that works by waiting until 100% you will find the following steps:
Get device ready . > Getting ready > Restoring your PC that you need to do is just waiting during the process because everything will be automatic.
17. Wait for Windows 8 basics wizard to start.
at this stage what you see is an introduction to the wizard that you will complete that helps adjust Windows 8 with preferences.
Four sections are displayed, including Personalization, Wireless, Settings, and Enter.
This screen only appears for a few seconds before automatically continuing to Personalization.
18. Choose your color theme & PC name.
Two fairly simple options are presented on the Personalize screen: one for the color you like and the other for the PC name
After you have finished selecting, click Next.
19. Use the default or Custom settings.
20. Enter your Microsoft name and password.
Enter a Microsoft account or you can fill in the origin because later there will be a trouble signing option, select Create a local Account.
21. Your account.
At this stage, enter the user name and password to make me new if it's> Click Finish.
22. Wait while Windows 8 completes the settings.
Remember all the personalization and other settings that you just made? Windows 8 now does that for your user account that was just created.
Just wait during this short phase.
Your installation of Windows 8 is almost complete ... just a few steps away.
23. Wait while Windows 8 prepares the start screen.
Regardless, the entire series of screen changes and messages only take a few minutes, please wait.
24. The process of installing Windows 8 is complete.
the process of installing Windows 8 is complete and you are ready to use it
What should I do next?
In order to maintain a computer performance, please install antivirus , driver updates and supporting devices to improve Windows 8 performance.
Thus for How to Install Windows 8 Complete with Pictures, hopefully it's useful, thank you.


